
前回Raspberry PiにMySQLを導入しました。
でもデータがないと意味がないですよね(×_×;)
といことで今回は温度・湿度データが取得できるICを導入してみたいと思います(ง°̀ロ°́)ง
使うICはどんなもの?
HDC1000という秋月電子で売っていたものを購入しましたヾ(。>﹏<。)ノ

- 温度・湿度のデータを単一ICで取得できる
- 取得データは一次変換するだけなので簡単に扱える
- I2Cで通信できるのでデータ取得が簡単
- 秋月電子に売っている(?)

接続は簡単。ケーブルでつなぐだけです!
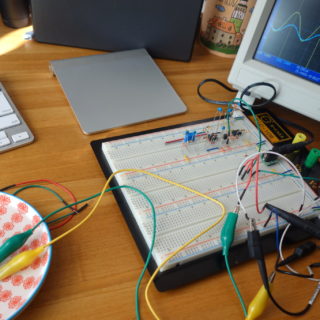
写真のようにHDC1000をRaspberry Piと接続します。ジャンパーが5本必要です。

Raspberry Piのピン配置については以前の記事にまとめているので参考にしてください。
HDC1000とRaspberry Piの接続
配線をちゃんとしてもうまく動かない可能性があります。作ったプログラムが悪いのか設定が悪いのか分からなくなったら行き詰まってしまうので、ちゃんと接続されているかと設定が正しいかを確認しましょう。

まずはライブラリのインストール
I2Cを制御するためのライブラリやツールをapt-get installでインストールします。
|
1 |
sudo apt-get install libi2c-dev i2c-tools |
i2cdetect を実行してみてましょう
i2cdetectコマンドでデバイスが接続されているかを確認できます。
|
1 |
$ i2cdetect -y 1 |
うまくいくと下記のようにデバイスのIDが返ってきます。

うまくいかない時には?
それでもうまくいかない場合があると思うのでいくつか例をあげておきます。
i2cがsuper userでないと使えない状態になっている
I2Cデバイスは一般ユーザーだとアクセスできないのでsudoでsuper user権限で実行する必要があります。
ですが、忘れてしまうケースがあったりsuで実行するのはあまりよろしくありません。
ということで、ユーザーpiをi2cにアクセスできるi2cグループに追加します。
|
1 |
$ sudo gpasswd -a pi i2c |
Raspberry Piの設定を変える方法
ダイアグで変える方法です。まずは下記コマンドを実行。
|
1 |
$ sudo raspi-config |
あとは画像のように、I2CをEnableにしてください。


/etc/modules に追記する
/etc/modules にi2c-devを追記します。
|
1 |
$ sudo nano /etc/modules |
とやって開きます。vimでもemacsでもなんでもOKです。
開いたファイルに
|
1 |
i2c-dev |
と追記して保存終了してください。
プログラムを作ってみます。
HDC1000用のClassを作りました。Pin#4をReady信号を受け取るinput pinにしています。お好みでHDC1000_RDY_PINを変えてください。
サンプルプログラムも添付します。自己責任でお願いします。hdc1000-sample
仕様はTexas Instrumentsのサイトにあります。
HDC1000を使うためのクラス
|
1 2 3 4 5 6 7 8 9 10 11 12 13 14 15 16 17 18 19 20 21 22 23 24 25 26 27 28 29 30 31 32 33 34 35 36 37 38 39 40 41 42 43 44 45 46 47 48 49 50 51 52 53 54 55 56 |
#ifndef HDC1000_H #define HDC1000_H /* HDC1000 register map Pointer Name Reset Description value 0x00 Temperature 0x0000 Temperature measurement output 0x01 Humidity 0x0000 Relative Humidity measurement output 0x02 Configuration 0x1000 HDC1000 configuration and status 0xFB Serial ID device dependent First 2 bytes of the serial ID of the part 0xFC Serial ID device dependent Mid 2 bytes of the serial ID of the part 0xFD Serial ID device dependent Last byte bit of the serial ID of the part 0xFE Manufacturer ID 0x5449 ID of Texas Instruments 0xFF Device ID 0x1000 ID of HDC1000 device */ #define HDC1000_I2C_ADDRESS 0x40 #define HDC1000_TEMPERATURE 0x00 #define HDC1000_HUMIDITY 0x01 #define HDC1000_CONFIGURATION 0x02 #define HDC1000_SERIAL_ID_1 0xFB #define HDC1000_SERIAL_ID_2 0xFC #define HDC1000_SERIAL_ID_3 0xFD #define HDC1000_MANUFACTURER_ID 0xFE #define HDC1000_DEVICE_ID 0xFF #define HDC1000_CONFIG_RST 0x80 #define HDC1000_CONFIG_HEAT 0x20 #define HDC1000_CONFIG_MODE 0x10 #define HDC1000_CONFIG_BTST 0x08 #define HDC1000_CONFIG_TRES 0x04 #define HDC1000_CONFIG_HRES_11 0x02 #define HDC1000_CONFIG_HRES_01 0x01 #define HDC1000_CONFIG_RSV 0x00 #define HDC1000_RDY_PIN 0x4 class Hdc1000 { public: Hdc1000(); virtual ~Hdc1000(); float GetTemperature(); float GetHumidity(); private: float temperature; float humidity; int fd; int SetRegister(unsigned char reg); int GetMeasuredData(); }; #endif |
|
1 2 3 4 5 6 7 8 9 10 11 12 13 14 15 16 17 18 19 20 21 22 23 24 25 26 27 28 29 30 31 32 33 34 35 36 37 38 39 40 41 42 43 44 45 46 47 48 49 50 51 52 53 54 55 56 57 58 59 60 61 62 63 64 65 66 67 68 69 |
#include <stdio.h> #include <unistd.h> #include <wiringPi.h> #include <wiringPiI2C.h> #include "i2cHdc1000.hpp" Hdc1000::Hdc1000() : temperature(0.0), humidity(0.0) { // To call GPIO without re-mapping wiringPiSetupGpio(); // Set Pin dedicating for ready Input pinMode(HDC1000_RDY_PIN, INPUT); // Get File handle descriptor fd = wiringPiI2CSetup(HDC1000_I2C_ADDRESS); } float Hdc1000::GetTemperature() { // Set target register and get measured data after it is ready SetRegister(HDC1000_TEMPERATURE); temperature = (float)GetMeasuredData(); //Convert from HDC1000 specification temperature = temperature / 65536.0 * 165.0 - 40.0; return temperature; } float Hdc1000::GetHumidity() { // Set target register and get measured data after it is ready SetRegister(HDC1000_HUMIDITY); humidity = (float)GetMeasuredData(); //Convert from HDC1000 specification humidity = humidity / 65536.0 * 100.0; return humidity; } int Hdc1000::GetMeasuredData() { unsigned char buff[2]; // Wait until the device is ready while(digitalRead(HDC1000_RDY_PIN) == HIGH); //Read from file descriptor read(fd, buff, sizeof(unsigned char) * 2); return (buff[0] << 8) | buff[1]; } int Hdc1000::SetRegister(unsigned char reg) { return wiringPiI2CWrite(fd, reg); } Hdc1000::~Hdc1000() { } |
サンプルのmakefileとmain関数です。
|
1 2 3 4 5 6 7 8 9 10 11 12 |
include <stdio.h> #include "i2cHdc1000.hpp" int main(int argc, char *argv[]) { Hdc1000 hdc1000; printf("%4.2f %4.2f\n", hdc1000.GetTemperature(), hdc1000.GetHumidity()); return 0; } |
Makefile
|
1 2 3 4 5 6 7 8 9 10 11 12 13 14 15 16 17 18 19 |
OBJS = i2cHdc1000.o main.o TARGET = hdc1000run CC = g++ CFLAGS = -Wall -lwiringPi .SUFFIXES: .cpp .c .o $(TARGET): $(OBJS) $(CC) $(OBJS) -o $(TARGET) $(CFLAGS) .c.o: $< $(CC) -c $(CFLAGS) $< .cpp.o: $< $(CC) -c $(CFLAGS) $< clean: rm -f $(OBJS) $(TARGET) |
makeで実行すれば実行ファイルhdc1000runができます。
まとめ
HDC1000を使ってRaspberry Piから温度・湿度を取得する方法をご紹介しました。ここからは実際にMySQLにデータを登録していきますよ(*´罒`*)ニヒヒ
記事を読んでいただいてありがとうございます。この記事がいいなと思ったら下記のSNSボタンのクリックをお願いします。励みになります😁




$ sudo gpasswd -a -pi i2c
とあるのは、
$ sudo gpasswd -a pi i2c
ですよね。
まっくん さん
修正しました。ご指摘ありがとうございます。